Single Sign-On allows LEA’s to control access to OnDataSuite from their identity provider. OnDataSuite uses Security Assertion Markup Language (SAML) to implement single sign-on. SAML works with any identity provider that supports creating custom SAML 2.0 apps. These include ClassLink, Azure AD, Google, Identity Automation, Active Directory Federation Services and others.
The basic login flow will appear as follows after you switch to single sign-on.
- Users click the sign in button in OnDataSuite. OnDataSuite creates a login request and redirects to the identity provider
- The Identity provider authenticates the user, generates a SAML response, and redirects back to OnDataSuite. The SAML response will include attributes describing the user that is logging in and which roles they should have.
- OnDataSuite validates the response, updates the users permissions, and logs them in.
User Accounts
There are two ways to handle user accounts with single sign-on. It can be used for authentication only, or for completely controlling user access and permissions from your identity provider.
Authentication Only
Authentication only user accounts and permissions are controlled in OnDataSuite. Your identity provider is only responsible for logging users into OnDataSuite. Every user that logs into OnDataSuite must already have an account set up. You can manage user accounts with the Administrator > User Administration tools in OnDataSuite. When creating/updating users, you will need to make sure their username matches the nameID attribute in the login request.
Identity Provider Controlled User Accounts
OnDataSuite uses the attributes in the SAML response to create new users and update the permissions of existing users.
Attributes:
- First Name: The users first name
- Last Name: The users last name
- Email Address: The users email address
- Groups\Roles: List of roles to assign to the user
The first name, last name, and email address attributes are only used to create users. Existing users can update their name and email through the account settings page.
The Groups/Roles attribute should be a list of User Access Roles. Any number of roles can be included in the groups/roles attribute. If a user is assigned multiple roles, the highest level of access will be authorized. Every time a user logs in, their permissions are updated based on the roles included in the SAML response.
Your identity provider may include object IDs instead of group/role names in the SAML response. They do this so you can change group/role names without breaking your single sign-on integrations. The User Access Roles page has a Single Sign-On Id field. If this is filled in, it will use value instead of the role name. This way your roles can have readable names and still be linked correctly to your identity provider.
Linking Existing User Accounts to your Identity Provider
You may need to update your user’s usernames in OnDataSuite to match the nameID attribute sent in the SAML response. You can update user accounts from the List, Edit and Delete Users page or the User Access Upload.
Configure the Identity Provider
Steps:
- Create a custom SAML 2 application on your identity provider
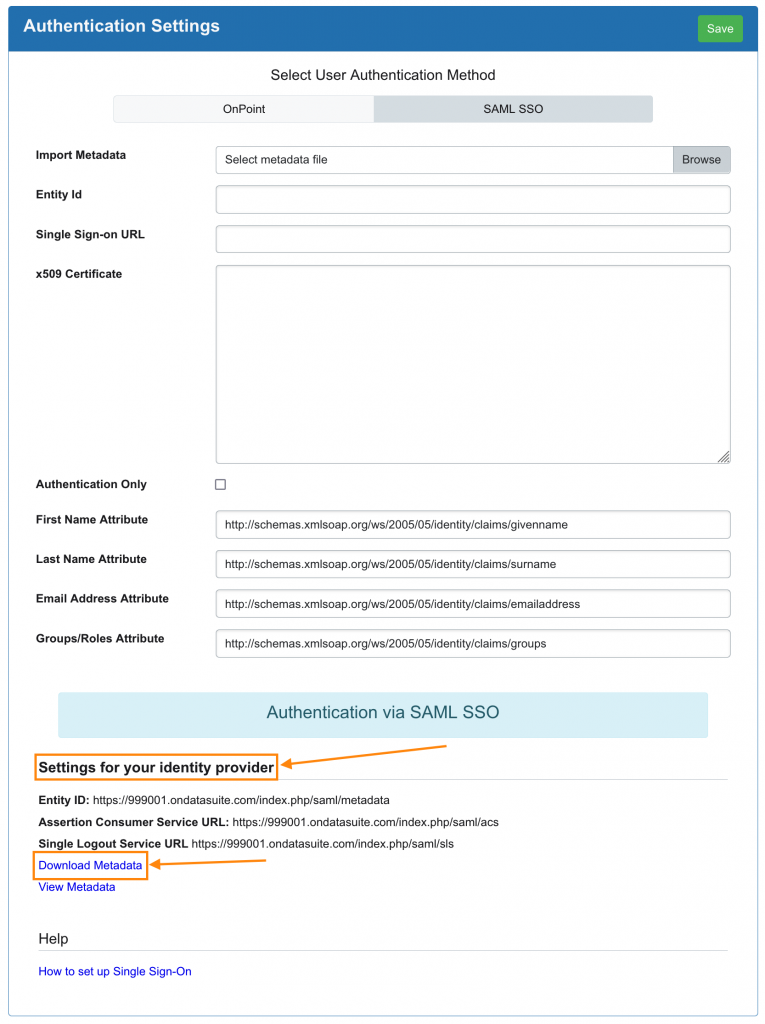
- Upload the OnDataSuite metadata. The metadata can be downloaded from the OnDataSuite Authentication Settings page.
- Configure the Attributes:
- NameID: should match the user’s username in OnDataSuite
- If not using authentication only, set up attributes for first name, last name, email address, and groups/roles
- Additional configuration:
- Set the Signature Algorithm/Digest Algorithm to SHA256
- Assertions must be signed
- Assign users to the application
Configuration values

Entity Id: <your-ondatasuite-domain>/index.php/saml/metadata
Assertion Consumer Service Endpoint: <your-ondatasuite-domain>/index.php/saml/acs
Single Logout Service Endpoint: <your-ondatasuite-domain>/index.php/saml/sls
Signature Algorithm/Digest Algorithm: must be SHA256
Sign Assertions: Assertions must be signed by the Identity Provider
Required Claims/Attributes:
- NameID: This value should be unique for every user and match the usernames of your OnDataSuite users. If this value is ever updated, the username in OnDataSuite will need to be updated.
Additional Attributes:
These should not be included if you are using authentication only.
The attribute names can be edited on the Authentication Settings Page.
- First Name: http://schemas.xmlsoap.org/ws/2005/05/identity/claims/givenname,
- Last Name: http://schemas.xmlsoap.org/ws/2005/05/identity/claims/surname,
- Email Address: http://schemas.xmlsoap.org/ws/2005/05/identity/claims/emailaddress,
- Groups/Roles: http://schemas.xmlsoap.org/ws/2005/05/identity/claims/groups,
Configure OnDataSuite
Create an Admin User Account
Before changing the authentication settings, create a user account with the username <district_number>_admin. (example: 999001_admin). This user only needs ODS Administrator privileges. After you switch to single sign-on, this is the only account that will be able to “sign in as admin” with username/password credentials to troubleshoot single sign-on issues.
Update your Authentication Settings
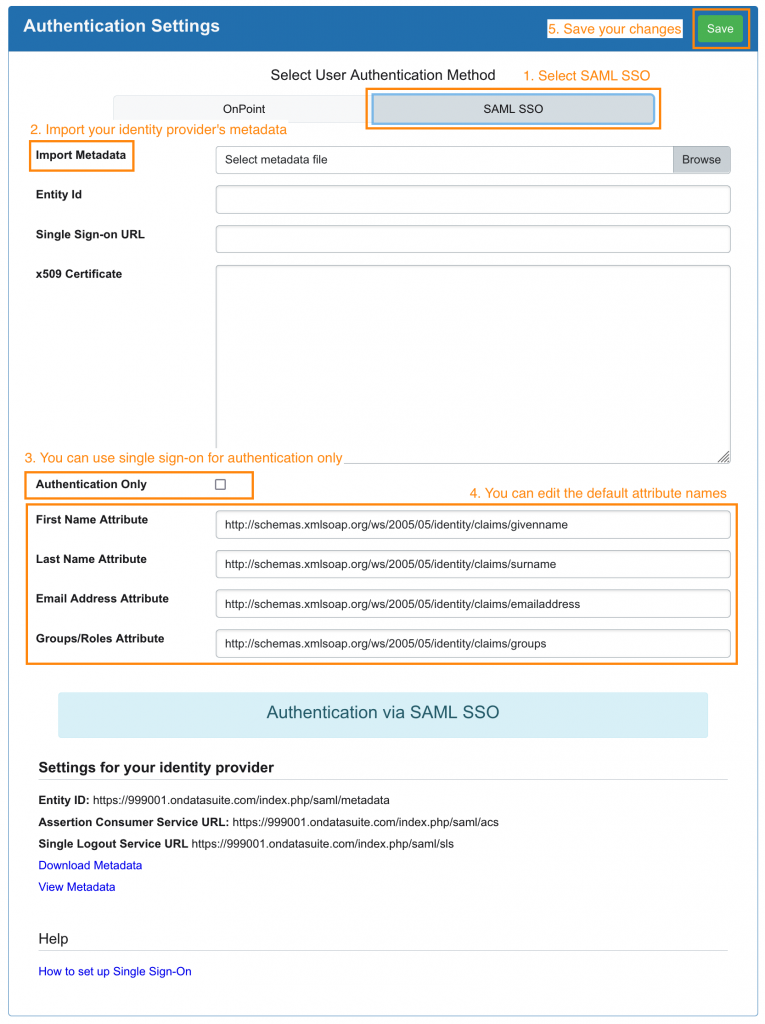
Go to Administrator > Site Settings > Authentication Settings and fill out the form to enable single sign-on
- Select SAML SSO.
- Import your identity providers metadata. If you cannot import the metadata, the form can be filled out manually.
- You can select authentication only.
- If you are not using authentication only, edit the attribute names for first name, last name, email address and groups/roles. They should match the names your identity provider will use in the SAML response.
- Save your settings and run the test.

Test Single Sign-On
Go to Administrator > Site Settings > Test SAML Configuration to test your single sign-on setup. When you click test you will be taken through the entire login flow. If login is unsuccessful, you will be presented with an error message and a hint on how to fix it.
When the test is successful, you will see which user is logged in, the profile settings, their permissions, and all of the other attributes sent. You can use the information in the test results to verify that the user is getting created correctly and see which attribute are getting sent in the SAML response.
Because the test takes you through the entire sign-in flow, errors may occur while you are on your identity providers site. If this happens, you will need to check with your identity provider to find out what went wrong.
Signing In
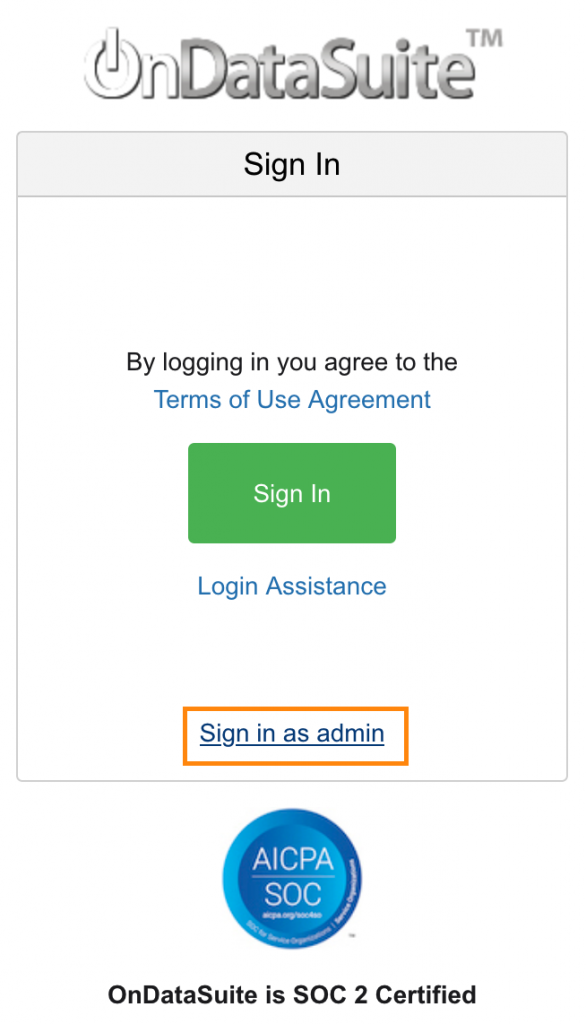
You will see a new sign in page when you go to OnDataSuite. The sign in button will start the login flow and redirect users to your identity provider to sign in. You can use the “Sign in as admin” button to login with your <district_number>_admin account to troubleshoot single sign-in issues. <district_number>_admin is the only account that can sign in as admin.

Signing In from your Identity Provider
If your identity provider gives you the option to create a sign in link, the link should point to:
<your-ondatasuite-domain>/index.php/saml/sso
Example: https://999001.ondatasuite.com/index.php/saml/sso)
Additional Assistance
If you need additional assistance please create a support ticket in your OnDataSuite system. You may also email [email protected] or call 1-800-521-2563 Ex:422.
